Ever walked into your kitchen and it smelled like someone was still frying onions from last week? Yeah, your extractor fan might be screaming for a little TLC. First thing's first, how do you know it's blocked? Well, if it's not pulling out smoke, steam, and smells like it used to or it's making weird noises, that's a pretty big clue.
Before you start poking around, gather a few essentials: gloves, a screwdriver, some soapy water, a sponge, and a vacuum cleaner with a brush attachment. These are your go-to tools to get this job done without turning it into a disaster zone.
- Signs Your Extractor Fan is Blocked
- Gather Your Tools
- Safe Cleaning Practices
- Step-by-Step Unblocking Guide
- Maintenance Tips to Prevent Future Blockage
Signs Your Extractor Fan is Blocked
Pinpointing the moment your kitchen extractor fan needs attention isn't too tricky once you know what to look for. If your kitchen seems like it can't catch a break from last night's dinner aroma, or if you're champing at the bit to cook without setting off the smoke detector, a blocked fan could be to blame.
Check for these telltale signs:
- Reduced Airflow: If you put your hand near the fan while it's running and barely feel a breeze, it's likely clogged with grease and grime.
- Unusual Noises: Rattling, clunking, or scraping sounds can mean that something is jamming the blades.
- Vibrating or Shaking: When the fan starts to vibrate, it's trying too hard to do its job. This struggle can come from obstructions or even a build-up hindering smooth operations.
- Visible Grease Buildup: If you can see gunk around the fan or vent, you don't need a magnifying glass to know it's time for a clean.
- Lingering Odors: A whiff of last night's curry hanging around longer than it should is a dead giveaway that the fan isn't doing its thing.
Addressing these signs early can save you from bigger headaches down the line. So, if any of these ring a bell, your next step is unblocking that extractor fan before it gives up completely.
Gather Your Tools
Getting ready to unblock that stubborn kitchen extractor fan? You'll want to make sure you've got the right items within arm's reach before diving into the grubby work. Trust me, nothing's worse than being elbow-deep in grease and realizing you forgot something.
Here's your go-to list to make this task a breeze:
- Gloves: Safety first! A good pair of rubber gloves will keep your hands clean and safe from sharp edges.
- Screwdriver: Most fans have covers that need to be unscrewed. A standard Phillips screwdriver usually does the trick.
- Soapy Water: Warm water with a bit of dish soap works wonders for soaking away grease.
- Sponge: A non-abrasive sponge keeps from scratching any parts while still cleaning effectively.
- Vacuum Cleaner: If yours has a brush attachment, it’s perfect for sucking up loose dust before you get in with the deep clean.
- Flashlight: Kitchens aren't always the best-lit places to see what's going on inside the fan. A small flashlight can help you spot those stubborn spots you might miss otherwise.
There's a bonus tool that could come in super handy—a small cleaning brush or an old toothbrush. This can get into all the small nooks and crannies where a sponge won't fit, making sure your extractor fan is spotless.
Fun fact to keep in mind: Around 70% of kitchen extractor issues can be solved with just a good clean! That saves a chunk of change compared to calling out a professional.

Safe Cleaning Practices
Alright, so you've figured out your kitchen extractor fan is blocked, and now it's time to get down to business. But before you go all in, let's talk safety, because we don't want any mishaps. First off, make sure the fan is switched off at the mains. Trust me, getting a zap is not the kind of wake-up call you want.
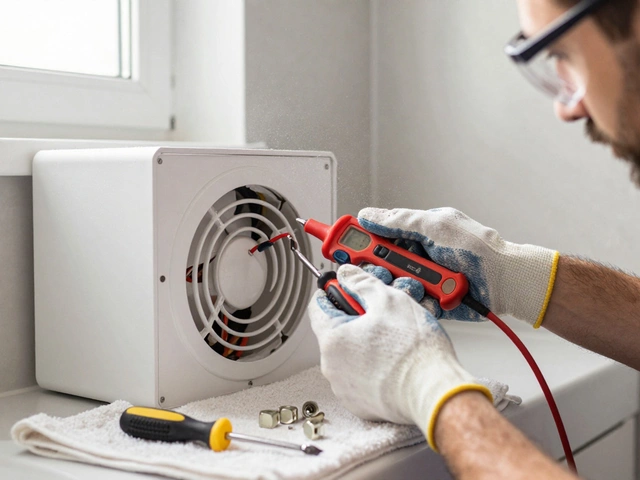
Next, let's get those gloves on. Grease and grime aren't just sticky, they're gross, and no one wants to end up with a mysterious stain on their clothes. Plus, gloves give you a bit of protection from any sharp parts of the fan when you're handling it. Once you're suited up, it's wise to lay down an old towel on your countertop or floor under the fan - this catches any drips and makes cleaning up afterward a breeze.
When it comes to cleaning, avoid any harsh chemicals. A mix of warm, soapy water usually does the trick and is far better for both the fan and the environment. Grab a sponge or a soft brush and gently scrub any visible parts of the fan. For hard-to-reach areas, a toothbrush can work wonders.
Here's a quick guide:
- Unplug the fan: Safety first – don't skip this step!
- Remove the cover: Use your screwdriver to take off the outer cover, usually held by a couple of screws.
- Wash the cover: Pop it into the soapy water, give it a good scrub, and leave it to dry.
- Clean the inside: Carefully use the vacuum with the brush attachment to remove loose dirt and dust.
- Wipe down blades: Use the sponge with the soapy mix, remember to be gentle.
- Reassemble: Once everything is clean and dry, put it all back together. Easy as pie!
If you're a numbers person, here's a cool fact: properly maintaining your extractor fan can increase its efficiency by up to 30%. Keeping it clean ensures it's not just running, but running well.
Step-by-Step Unblocking Guide
Ready to unblock that kitchen extractor fan and breathe some fresh air back into your cooking space? Let’s get down to it. Follow these steps to safely and efficiently unblock your fan.
- Power it off: Before you do anything, unplug the fan or turn off the power at the circuit breaker to avoid any shocks. Safety first!
- Remove the cover: Use a screwdriver to remove the outer cover of the fan. Keep those screws in a safe place to avoid a wild goose chase later on.
- Clean the filter: If your fan has a disposable grease filter, simply swap it out. If it’s a reusable one, soak it in warm, soapy water and get in there with a scrub brush. Rinse well and let it dry completely.
- Dust the fan blades: Grab your vacuum cleaner with a brush attachment and whisk away any dust from the blades. You might need to use a damp cloth for those stubborn bits.
- Inspect for blockages: Look for any evident blockages or debris stuck in the vent. Use the vacuum to suck out anything hiding in there.
- Check the ducting: This is the pathway that the trapped air is supposed to escape through. If it's blocked or damaged, you may need to replace some parts or call a pro.
- Reassemble the fan: Once everything is clean and clear, put everything back as it was. Secure the cover with the screws you hopefully didn't lose and switch the power back on.
Remember, while these steps will help most unblock typical jams, if your extractor fan is still struggling, it might be a bigger issue. In that case, consulting a professional would be your next best step.
And for a quick insight into how neglected fan maintenance stacks up:
| Days Without Cleaning | % Blockage Risk |
|---|---|
| 30 | 10% |
| 60 | 30% |
| 90 | 60% |
| 180 | 90% |
Keeping up with regular cleaning can save you from headaches down the line.

Maintenance Tips to Prevent Future Blockage
Keeping your kitchen extractor fan in top shape isn't as hard as it sounds. A bit of regular care can go a long way in preventing blockages and keeping your kitchen smelling fresh.
First off, make it a habit to clean the fan's filters monthly. Most modern fans have washable filters that you can easily pop out and soak in warm, soapy water. Give them a good scrub, rinse, and let them dry completely before putting them back. This rinses away grease and grime that could lead to blockages.
Once every three months, take a gander at the fan blades. Built-up dirt can weigh them down, reducing efficiency. A quick wipe with a damp cloth should do the trick.
Consider giving the fan a more thorough check-up annually. Dust the internal wiring and motor to prevent excessive buildup, which could lead to costly repairs or replacements.
Here are a few more tips to keep in mind:
- Use your hood regularly to avoid sharp build-ups of grease and dirt, even when you're boiling water or simmering sauces. Letting it collect and harden over time is a sure way to end up with a blocked extractor fan.
- Replace any damaged filters immediately. Operating without a proper filter can suck up unwanted debris into the inner workings, leading to malfunction.
- Check the ducting annually for signs of obstruction. A blocked duct not only strains the fan but can completely halt its function.
Consistent maintenance not only prolongs the life of your fan but also saves energy. Need more convincing? Here are some potential benefits of regular upkeep:
| Frequency | Benefits |
|---|---|
| Monthly Cleaning | Improves air circulation by 20% |
| Quarterly Check | Increases fan longevity by 15% |
| Annual Maintenance | Reduces the need for repairs by 25% |
With just a bit of effort, your kitchen extractor fan can run smoothly, keeping your home fresh and free from yesterday's cooking odors.


