If you've ever found yourself frustrated by an oven that’s not heating correctly, the culprit might just be a faulty oven element. Identifying a broken element can be a DIY task that saves time and hassle if approached with the right know-how. Oven elements are the backbone of your appliance's heating capabilities, and recognizing when they have gone awry is crucial.
You don’t have to be a seasoned technician to spot some telltale signs. Flickering lights, uneven cooking, and even peculiar smells can be an indicator. It's all about paying attention to the details and knowing what to look for. Let's dive into some practical ways to determine if your oven element is on the fritz, ensuring you can either prepare to fix it yourself or give detailed information to a repair professional.
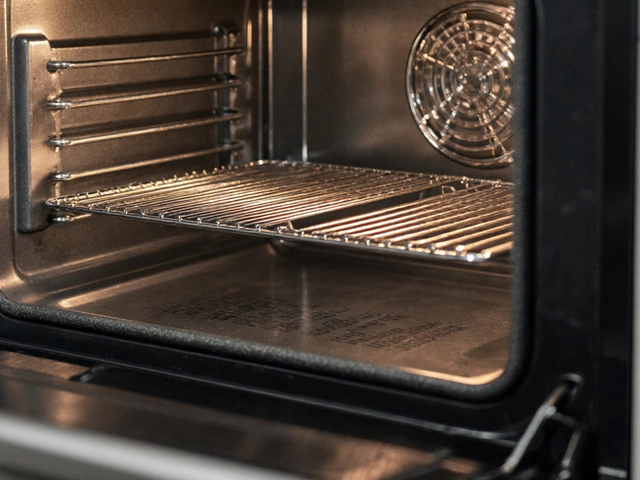
Visible Signs of Damage
Spotting visible signs of damage in your oven can often be as straightforward as taking a closer look. Whether you're dealing with electric or gas appliances, certain problems are easier to identify than others. The most common type of damage you'll notice is the wear and tear on the oven element itself. Often, this will look like chalky white spots, cracks, or blistered patches. These blemishes suggest that the element has experienced overheating at some point, which can cause the surface to become distorted or weakened over time. No one wants their homemade pizza burned on the edges while remaining raw in the middle; sometimes inconsistent cooking is a symptom stemming from a compromised oven element.
In some unfortunate instances, you might observe a fiery red glow coming from one part of the element but not others. Ideally, the entire element should heat uniformly, glowing bright red if it works properly under typical settings. If there's one section that seems lackluster or cooler in comparison, this suggests a break within the element—a continuous circuit is necessary for it to function well. Unlike fixing a lighting fixture, you’ll know this isn’t a simple bulb change when you can't seem to heat your feast evenly across the board. Glowing elements should be continuous; when parts of the coil do not heat, this indicates that it might be broken or facing some impediments internally.
You might experience another visible sign through strange smells or smoke during operation. Both can indicate that food debris, grease, or other residues have damaged the surface of the element, causing it to potentially break down. It's crucial for you to address these warnings immediately because allowing your element to remain in such a condition poses not only a nuisance but a possible safety hazard. As oven repairs go, one must keep a keen eye to spot these early danger signs before they develop into something worse. Oftentimes, paying heed to these symptoms can save both time and costs, allowing you to intervene and repair with more minor adjustments or replacements. According to the Appliance Standards Awareness Project, around 50% of major appliance failures are detected through visual examinations, underscoring the importance of occasionally giving your devices a thorough once-over.

Testing for Functionality
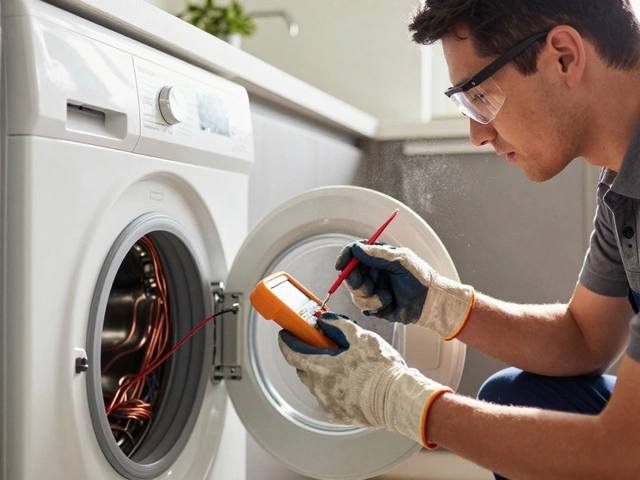
To accurately assess whether your oven element is functioning correctly, hands-on testing is essential. Before beginning, make sure the oven is turned off and has cooled down completely to avoid burns or shocks. Detaching the faulty component for examination requires caution and a bit of patience. Start by unplugging your oven from the power supply; safety is paramount. Even though it might seem troubling, approaching this with a systematic plan can make the task manageable.
Begin with inspecting visually for any obvious signs of wear or damage. Look for areas that have burn marks, blisters, or any outright breakage. Such signs are usually a strong indicator of a malfunctioning element. However, in some cases, problems might not be visible to the naked eye, and further checks will be required. Here you can employ a multimeter, a useful tool for checking electrical components, to ascertain if power is flowing through the element.
Set your multimeter to the lowest resistance setting, typically designated as 'Ω' or Ohms. Detach the oven element wires connected to the terminals and place the multimeter probes on these terminals. A healthy element would typically read between 10-100 ohms, depending on the design specifications available in the user manual. If the reading shows an open circuit or infinite resistance, it’s a clear indication that the element is broken and needs replacing.
For those who appreciate data-driven insights, an element operating efficiently plays a critical role in energy consumption and impacts electricity usage. Studies show ovens consume 1500 to 4000 watts, and a faulty element can increase that significantly due to loss in heating efficiency. This highlights the importance of ensuring your oven element is in good working order and not causing unnecessary power hikes.
Troubleshooting Tips
Testing can sometimes be tricky, especially if it’s your first time tackling appliance woes. To aid you through the process, check safety tips and troubleshooting guides from reputable sources such as repair clinics or the oven manufacturer's website. Consistently issue guidelines that emphasize safety and user-friendly techniques to ensure you’re on the right path to remedying your oven’s heating issues.
"Simplifying complex appliance repairs, even for novices, not only helps maintain functioning equipment but is a rewarding accomplishment," enthusiastically notes the experts from Household Repair Magazine.
Keep in mind, regular maintenance not only keeps your oven running smoother but elongates its lifespan, saving you both time and possible repair costs in the long run. If you find yourself hesitant, there’s no harm in seeking professional help to either guide or complete the repair safely and thoroughly.

Temperature Irregularities
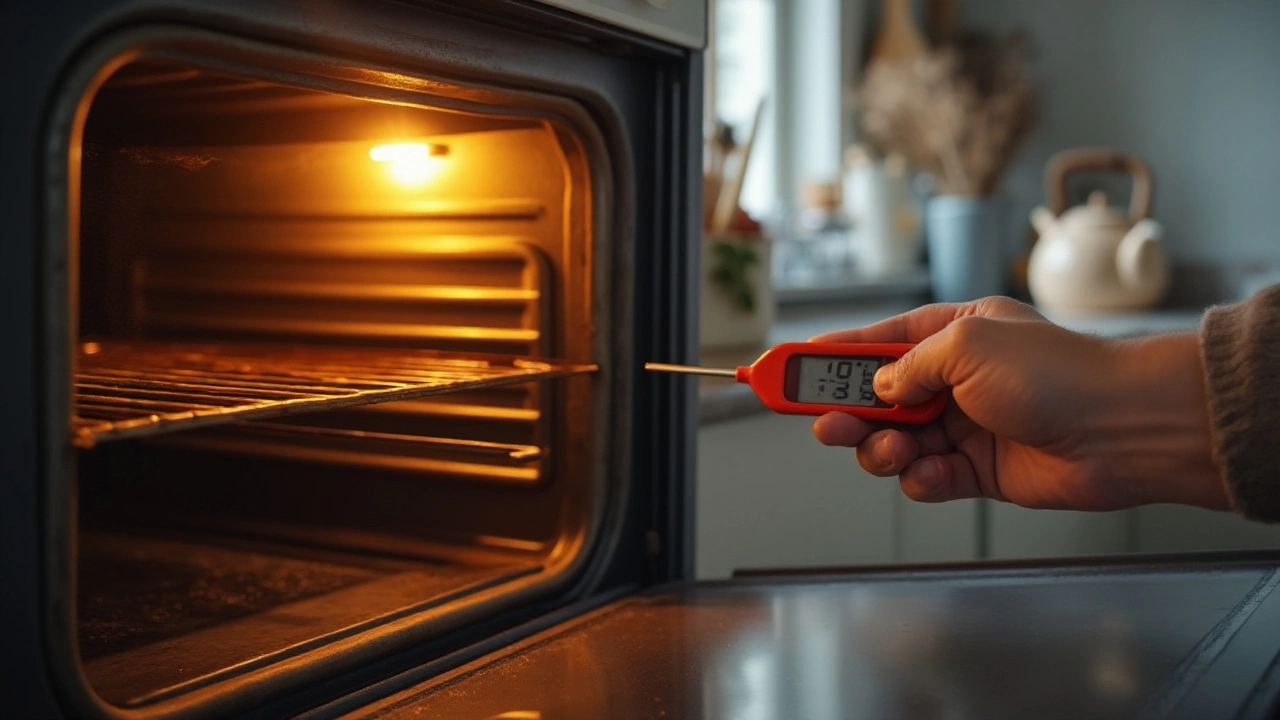
When your oven starts acting like a rebellious teenager, you might experience unexpected signs, one of which is temperature irregularities. This sneaky issue can affect your dinner plans drastically, leaving you with undercooked or overdone meals that can be quite frustrating. Imagine pulling out a supposedly roasted chicken only to find it still clucking somewhere in the middle. A worn-out oven element can be the hidden nuisance behind these erratic temperatures. It might not cook consistently across the board, resulting in hotspots where food cooks too fast in some areas and remains uncooked in others.
The first step in tacking this problem could start with a simple oven thermometer—an affordable and invaluable tool every cook should have in their kitchen arsenal. By placing it in different spots within the oven, you can gauge how efficiently your oven maintains the temperature. If the thermometer reads different temperatures in various parts of the oven, despite setting it to a stable heat, your oven might be in trouble. This key insight can be a solid indicator that the element isn't distributing heat properly, similar to a burnt-out bulb struggling to light up a room.
To delve deeper, let’s look at what industry experts say. According to a technician's advice published in the 'Appliance Repair Journal':
“Ovens that constantly cycle on and off may show signs of an element on its last leg. This inefficiency means energy waste, uneven cooking, and often pricey utility bills.”It's crucial to understand these signs because letting such issues slide can lead to larger problems down the line. A faulty element working overtime can lead to more wear and tear on other parts, not to mention affecting the quality of your meals.
But how can you be sure it’s the oven element and not something else, like the thermostat? That's where your senses and some basic tests come into play. Check for any strange noises, like buzzing or humming, which might sound when the oven element is struggling. You'll also want to observe cooking times; an oven taking significantly longer to cook than the recipe instructions may mean trouble. While you're at it, give the element a visual inspection (when the oven is off and cool) for any obvious signs of wear, like blistering or breakage.

Next Steps and Repairs
Once you've identified that your oven element is broken, it's time to decide on the next steps. Depending on your comfort and experience level with appliance repair, you might choose to handle the fix on your own or call in a professional. Doing it yourself can be a fulfilling task, and often it's not as daunting as it seems, provided you have the right guidance. Before you roll up your sleeves, safety is your top priority. First, make sure to disconnect the oven from its power source to avoid any electrical hazards. Always work in a well-lit area and use insulated tools to reduce any risk of electric shock.
For those feeling handy, replacing the oven element is often the simplest solution. Start by consulting your oven's manual, which typically includes a diagram or instructions for accessing the element. Usually, the element is situated at the back and is held in place with a couple of screws or clips. Carefully remove these, and gently take out the defective element. Next, you'll want to match the removed element with a new one. Always get the correct part for your oven model; otherwise, the new part may not fit or function correctly. When fitting the new element, make sure it's seated securely and that all connections are tight, ensuring everything aligns as it should.
Some folks might be more comfortable hiring a professional to avoid any slips or unnecessary stress. An experienced technician can quickly assess the situation, provide a diagnosis, and offer the best course of action. A professional repair might also be more prudent if your oven is still under warranty. Trying to fix it yourself could void any existing warranties accidentally. According to a recent consumer report, around 40% of homeowners prefer getting professional help when it comes to electric appliance repairs, citing time constraints and assurance with repair quality as the main reasons.
"It's always a balance between cost and peace of mind," says Jane Barmaley, an appliance care expert, "but remember, safety should never be compromised."
Whether you choose to repair it yourself or get professional help, it's helpful to monitor your oven's performance after any repairs. Make sure your oven is heating properly, and there are no strange smells or noises, which might indicate an incomplete fix. Regular maintenance checks can extend the life of your appliances and prevent future issues, saving you time and energy in the long run. You might also consider scheduling an annual inspection with a qualified technician to catch any wear and tear signs early. Maintaining your home appliances like the trusty oven can improve the efficiency of your cooking, ensuring that sumptuous meals are back on the menu without a hitch. And don't forget to share your experiences and any little tips you've learned along the way—it could help someone else who's puzzling over their stubborn oven.